Instructions
How to play
BattleTwin runs in your browser. This page shows the steps of a game, the orders, the clock and the score. The labelled pictures come from the practice mission of the webinar.
Before you start
A laptop and a browser
Use a laptop with a current browser. Bring its charger.
Pick your level
The first question asks: “Have you played a wargame before?” Press “New to wargames”, then Continue.
Note your call-sign
In a scored game, the game gives you a call-sign and a seat number. Note both when you start.
Keep one window
Play in one browser window from start to end. A private window starts a new join.
Steps of a game
Read the brief
The first screen is the mission brief, with the task, the steps and what you know of Red. A short guide may open on it. Follow the guide, or skip it.
Read the objectives before the map
Open Objectives and read the primary objective. The primary objective comes first in the score.
Choose your fleet
Pick a starter fleet. You can buy extras with a budget of points. Every point that you do not spend scores a bonus, so buy only what your plan needs.
Give first orders
Select a group, pick an order, and click the map. Before Begin, these orders are your tasking order for the day. A group with nothing to do shows “No order”.
Press Begin, then set the speed
The game opens paused, and nothing moves until you press Begin. At 1x, game time runs at real time. At 20x, one real minute is 20 game minutes.
Answer messages and decisions
Messages show what needs you. Click a message, and the map jumps to its cause. When a decision card comes, pause first and think about what each answer costs.
Read the debrief
At the end, the debrief shows your objectives, what you kept and what it cost. It also gives the reasons.
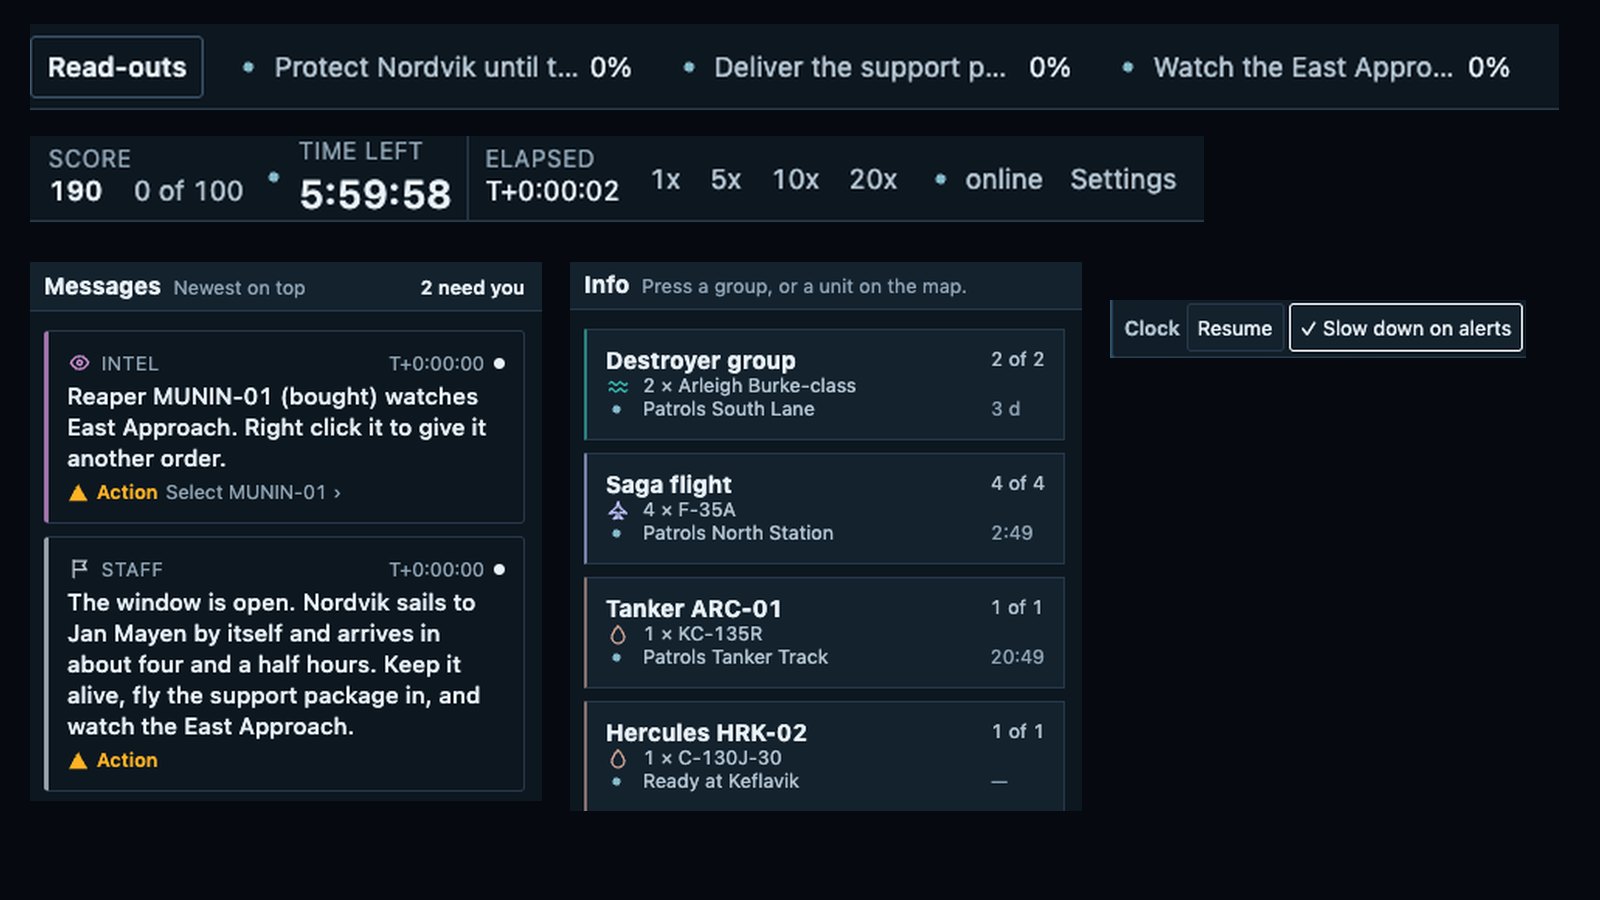
The main parts of the desk
- Across the top are your objectives, and how far along each one is.
- Next to them are your score, the time left and the clock.
- On the right, the messages show what needs you now.
- Below them are your groups, and what each one does now.
- In the clock controls, leave “Slow down on alerts” on. It drops the clock to 1x when something happens.
Orders and risk rules
You command groups, not pilots. Each group gets a standing order, and the simulation flies and fights. After Begin, any new order is a re-task.
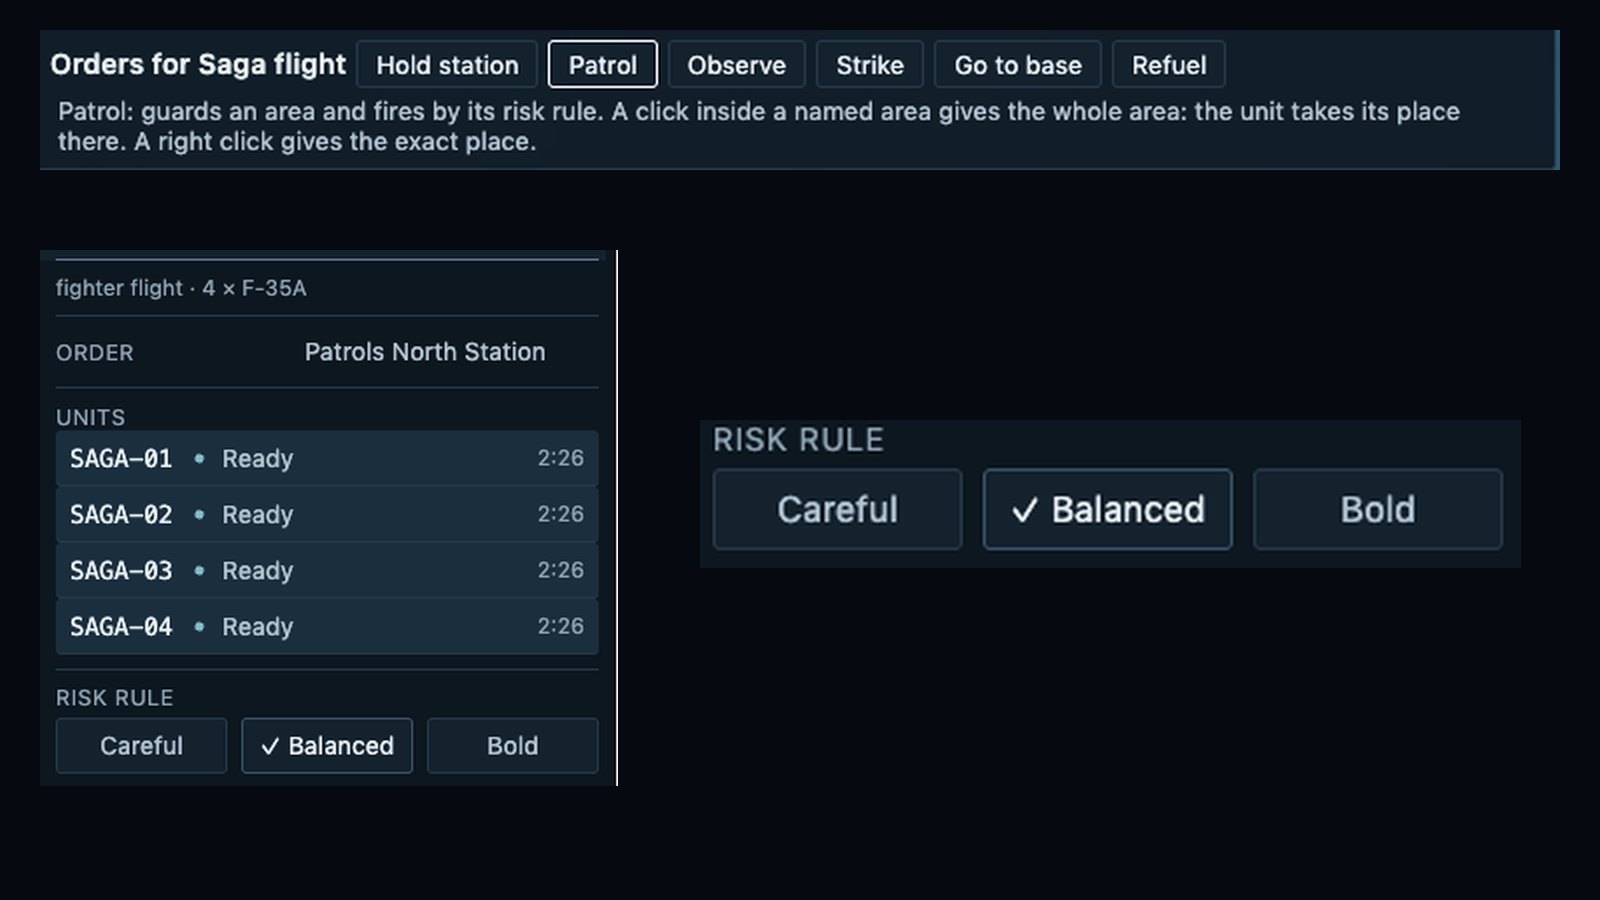
The missions
| Order | What it does |
|---|---|
| Patrol | Holds an area, and fires by its risk rule. |
| Observe | Watches an area and holds fire. |
| Strike | Attacks one contact. Strike a contact that you have identified. |
| Deliver | Carries cargo to a place. |
| Hold station | Stays at one place. |
| Go to base, Refuel | Act at once, with no click on the map. |
The order bar shows only what the selected group can do. Fighters carry no cargo, so they have no Deliver button.
The risk rules
| Rule | When the group fires |
|---|---|
| Careful | It holds fire. |
| Balanced | It fires only at contacts identified as hostile. This rule is the sensible default. |
| Bold | It fires at anything not known to be friendly or neutral. |
Bold can fire at a neutral ship that is not identified. If you are not sure, use Balanced and identify the contact first.
For Patrol, Observe and Deliver, a left click inside a named area gives the whole area. A right click gives the exact place.
Time
The game opens paused, on the set-up. When you press Begin, the clock runs from 1x up to 20x.
A mission covers hours of game time, and you have far less real time. So speed up in the quiet parts, and slow down when it matters. Pause gives you time to think.
The score
The debrief is your assessment. The score puts the objectives first. Then it counts what you kept: forces, missiles and budget.
After that, it counts how early you finished and how fast you answered decisions. If you never give an order, the game notices and caps your score.
Labelled screenshots
Each number on a picture names one part of the desk. The list under each picture gives the same labels. Select a number to read its label.
1 · The main screen
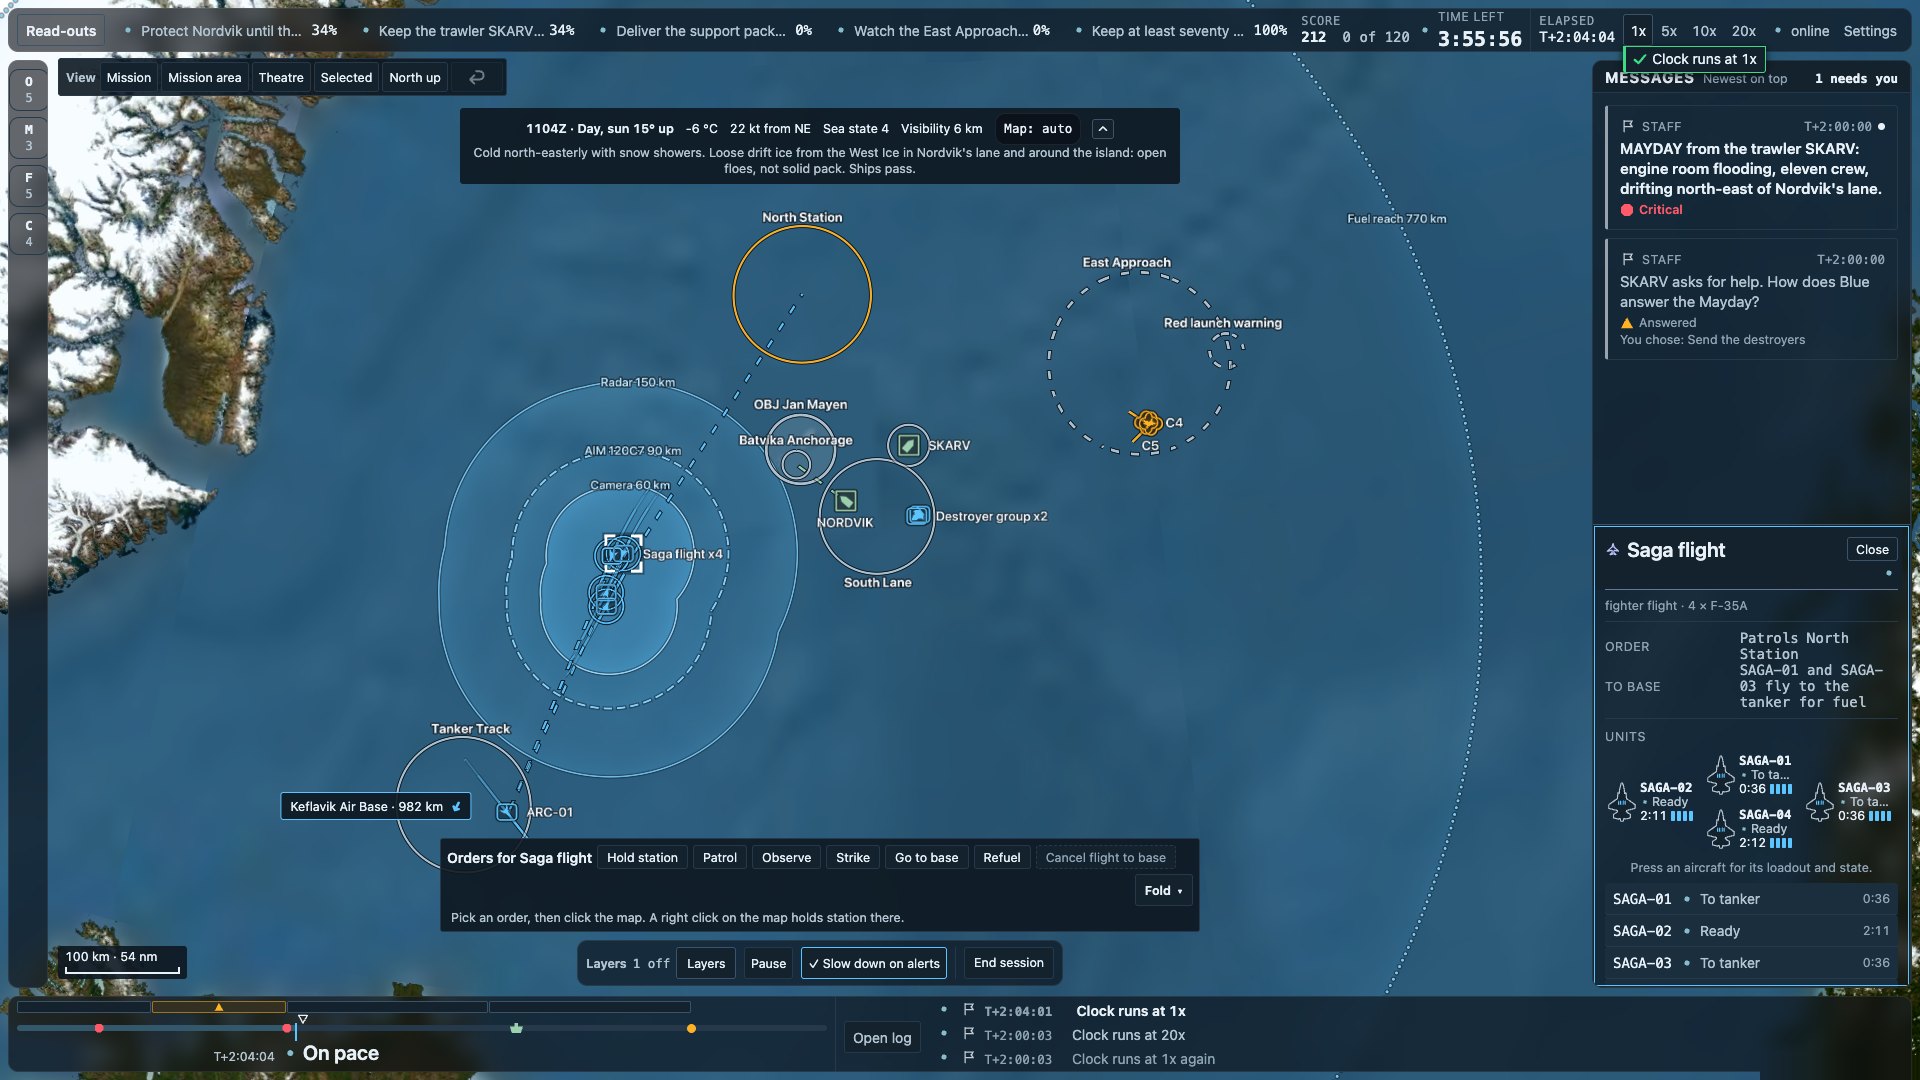
The picture shows the practice mission two hours in, with Saga flight selected. The clock runs at 1x after a decision.
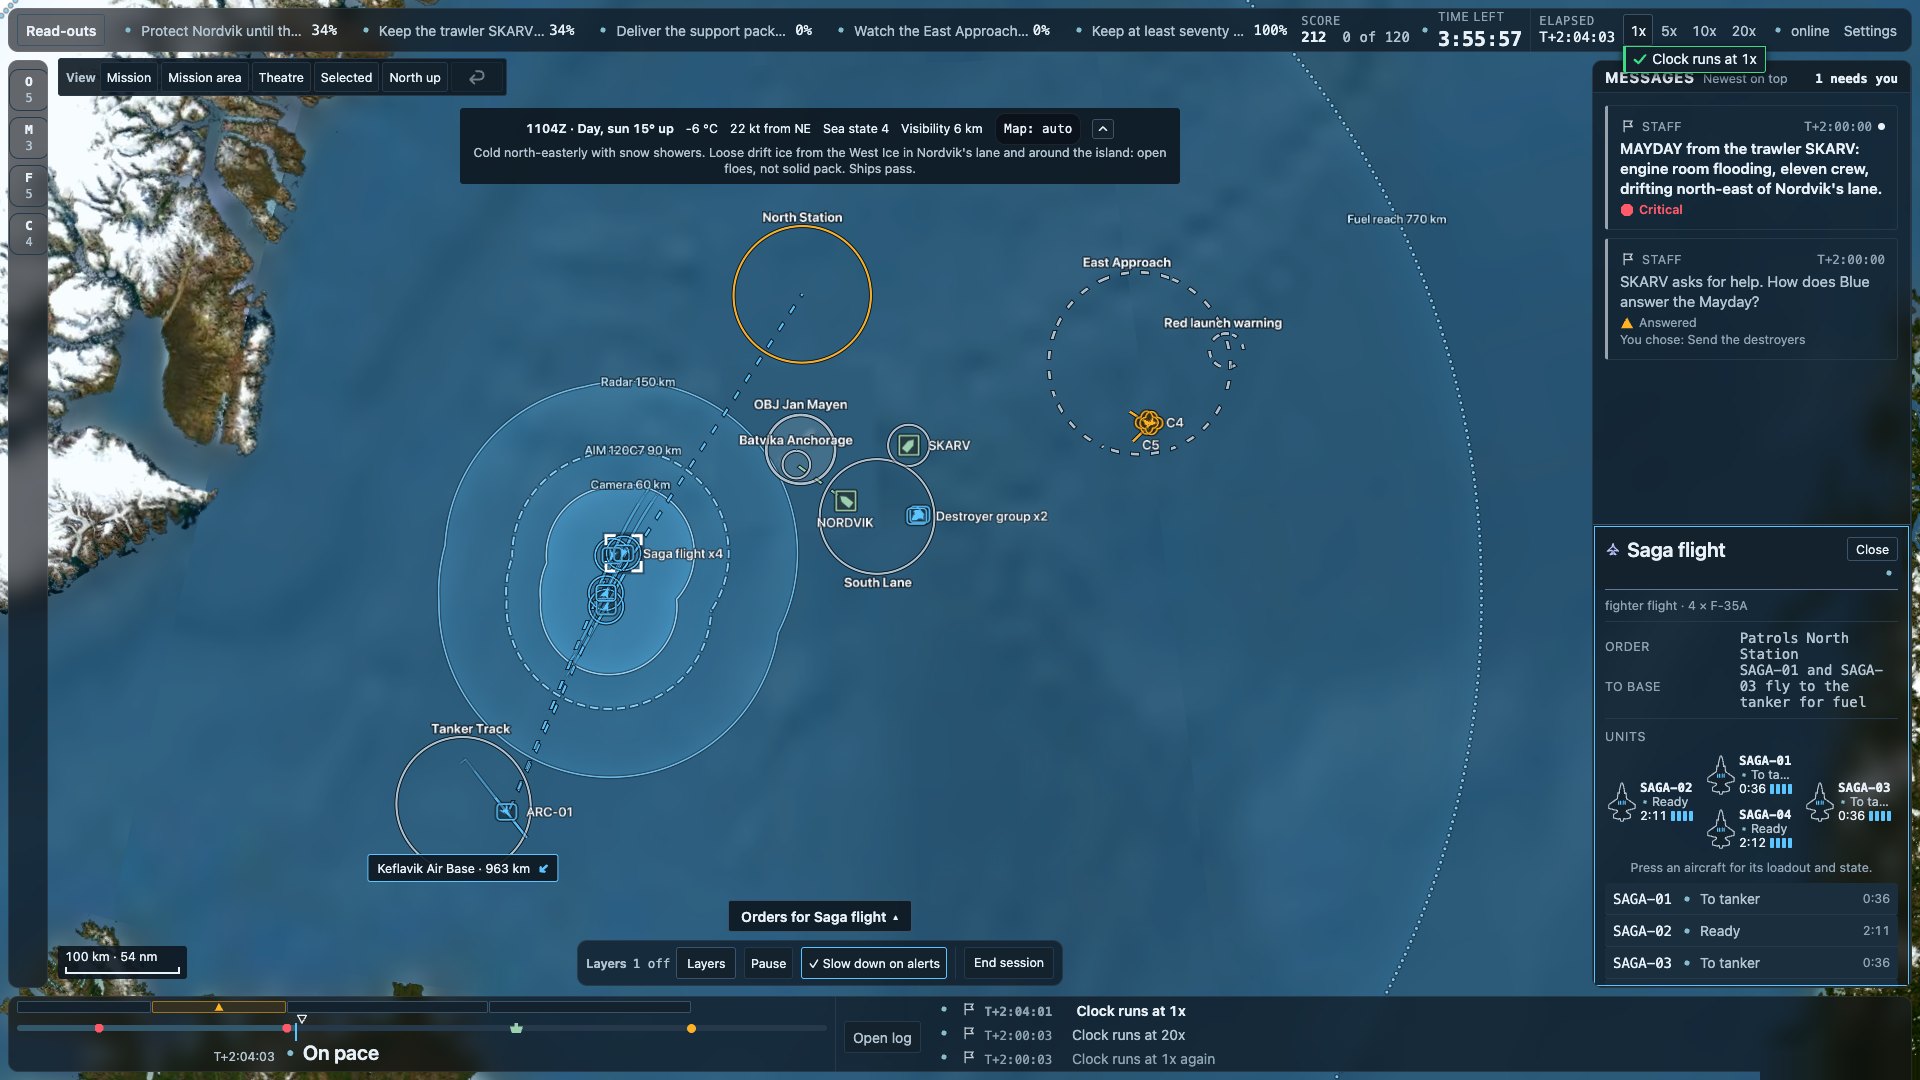
- Read-outs. This button is at the left end of the top bar. It opens the read-outs: losses, fuel, weapons, contacts and the link.
- Objectives strip. Each chip is one objective, with its progress in percent. Hover a chip to see its deadline. Watch these chips to know how the game goes.
- Score. The big number is your score. Beside it are the objective points that you have reached, out of all the points.
- Time left and elapsed time. Time left is the game time that remains. Elapsed time is the mission clock.
- Speed buttons. These buttons set how fast game time runs: 1x, 5x, 10x or 20x. A small chip below them tells you what the clock did.
- Settings and link. Settings opens the settings. The word “online” shows that the game has a link to the server.
- Left rail. The rail has four tabs with counts: Objectives, Missions, Force and Contacts. Press a tab to open its list. Press it again to close the list.
- View bar. These camera buttons are Mission, Mission area, Theatre, Selected and North up. The arrow goes back to the previous view.
- Weather strip. The strip shows Zulu time, light, temperature, wind, sea state and visibility. “Map: auto” means that the map follows the light.
- Units and group tags. Blue symbols are your units. The tag gives the group name and the number of units in that symbol.
- Named areas. Circles with names mark areas. A thin outline is a station, and a filled circle is an objective area. A dashed circle is an area to watch.
- Range discs. The selected unit shows its ranges: radar, weapon, camera and fuel reach. They show what the unit can see, shoot and reach.
- Contacts. Contacts are what your side has detected. Amber means not identified. A confirmed Red contact is a red diamond, and a reported one is dashed.
- Dashed line. A dashed line goes from a unit to the middle of the area that it has orders for. It shows the destination, not the route.
- Solid line. A solid line shows the trail behind a unit. Its front part shows where the unit will be in 120 seconds.
- Scale bar. The scale bar gives a length on the map in kilometres and nautical miles. It changes when you zoom.
- Base pointer. This pointer shows an air base that is off the screen. It gives the name, the distance and the direction.
- Orders button. This button appears when you select a group. Press it to open the order bar, which picture 3 shows.
- Dock. The dock holds Layers, Pause, “Slow down on alerts” and End session. “Slow down on alerts” drops the clock to 1x for a decision or a loss.
- Messages. The game talks to you here, with staff messages, decisions and warnings. The most urgent come first. The count shows how many need you.
- Group card. This card shows the selected group: its order, its next action and its risk rule. Close puts the Info list back.
- Formation view. The aircraft of the group show as a formation, with call-sign, state, fuel and rounds. Press one aircraft to see its loadout. Press All to go back.
- Unit rows. Each unit of the group has one row, with its call-sign, its state and its time left.
- Timeline. The day bar shows the phases of the plan and marks for events. The hollow triangle shows where the plan is now.
- Pace word. This word says “On pace”, “Behind” or “Ahead”. It compares the game with the plan.
- Log strip. The newest lines of the log show here, with their game time. “Open log” opens the full log.
2 · A decision card
A decision waits, so the clock slows to 1x by itself.
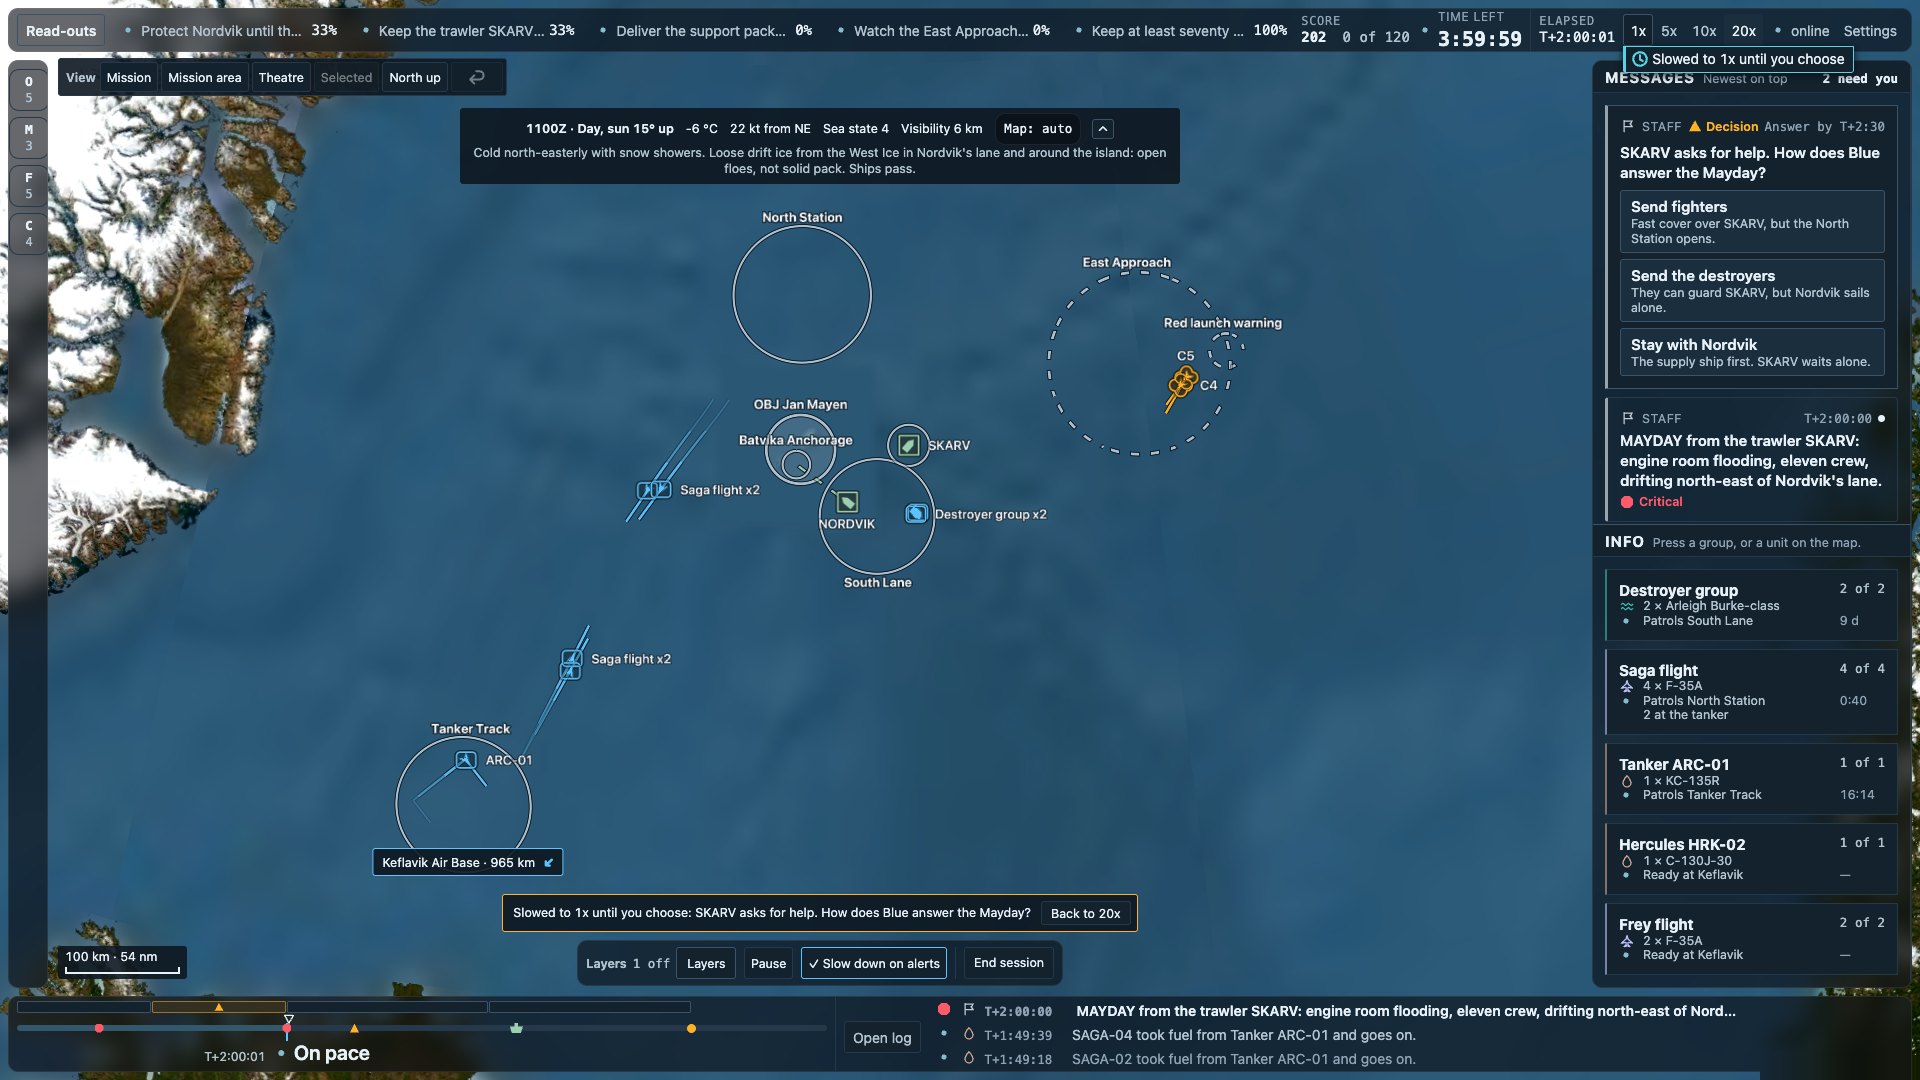
- Decision card. The card gives three answers, and each answer says what it costs. The card also gives a time limit for your answer.
- Slowed to 1x. The clock dropped to 1x by itself, because a decision waits for you.
- Banner and “Back to 20x”. The banner at the bottom of the map says the same thing. “Back to 20x” returns the clock to the fast rate.
- Staff message. This staff message raised the decision. A red mark shows that the message is critical.
- Info list. Each group has one row: name, units alive, current order and fuel time. Press a row to select that group.
- Log strip. The log strip shows the same message. A red dot marks it as critical.
3 · The order bar
This is the same moment as picture 1, after a press on the orders button.
- Order bar. This bar shows the orders for the selected group. It shows only the orders that this group can do.
- Hold station, Patrol, Observe. Pick one of these orders, then click the map. Hold station stays at a place. Patrol guards an area and fires by its risk rule. Observe watches and holds fire.
- Strike. Strike attacks one contact. Click the contact, not the sea.
- Go to base and Refuel. These orders act at once. You do not click the map.
- Fold. Fold puts the order bar away.
- Hint line. The hint line tells you what your next click does. Inside a named area, a left click gives the whole area. A right click gives the exact place.
4 · The mission brief
This is the first screen of a mission, before the set-up.
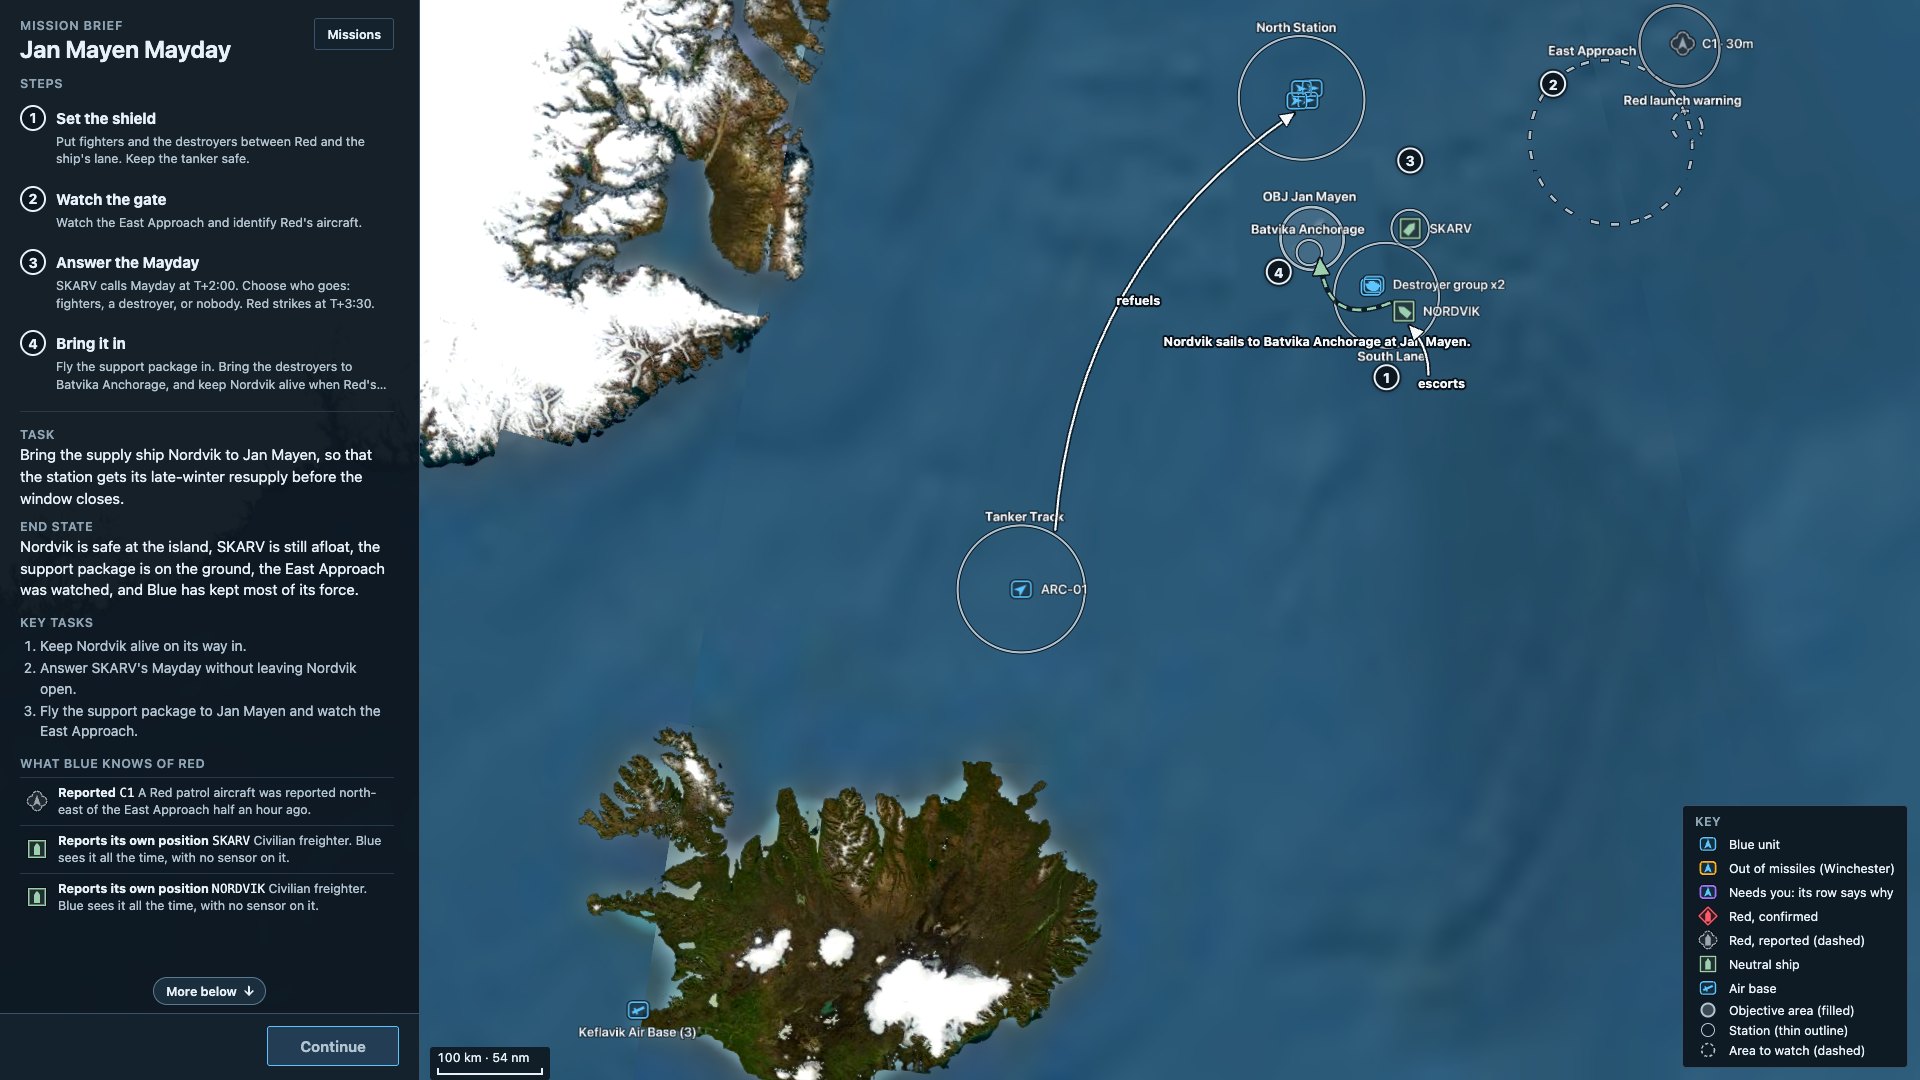
- Mission brief. The brief is the first screen of a mission. Read it before you touch the map.
- Steps. The brief gives the mission in four steps. Their numbers match the numbered circles on the map.
- Task and end state. The task says what Blue must do. The end state says what a good end looks like.
- What Blue knows of Red. This list shows what your side knows of Red, and how it knows it.
- Numbered circles. On the map, each step number sits near the thing that it is about.
- Key. The key explains the symbols on the map: units, Red contacts, neutral ships, bases and areas.
- Continue. Continue takes you from the brief to the set-up.
Map symbols and lines
- Solid line from a unitIt shows the trail of the unit, where it has been. The front part shows where it will be in 120 seconds.
- Dashed line from a unitIt goes to the middle of the area that the unit has orders for. It shows the goal, not the route.
- Circles and areasA thin solid outline is a station. A filled circle is an objective area. A dashed circle is an area to watch.
- Range discsSoft shaded discs with a label belong to the selected unit. They show radar, camera, weapon and fuel reach.
- Blue, Red and neutralBlue symbols are your side. A confirmed Red contact is a red diamond, and a reported one is dashed. Amber means not identified. Neutral ships have a green symbol.
- FramesAn amber frame means out of missiles. A violet frame means that the unit needs you, and its row says why.
- MissilesThe map does not draw missiles. A shoot-down shows only as a line in the log.
- DestroyersA destroyer defends another ship only within 20 km of it.